The Break-and-Retest is one of the most durable, intuitive, and testable strategies in Forex trading. At its core, it formalizes a common market behavior: when price breaks through a well-watched level, it often returns to retest that level from the other side before continuing. That retest presents a logical entry point, a natural location for stops, and a framework for targeting the next structural objective. Because this behavior emerges in currencies of every liquidity profile and across timeframes—from M5 scalps in the London open to H4 and Daily swings—it is an ideal strategy to codify, backtest, and scale.
This professional guide transforms the Break-and-Retest from an idea into an execution blueprint. We start with precise definitions, the trader psychology that creates retests, and a field-tested recognition checklist that filters noise from signal. Then we dive into entry models (direct, confirmation, lower-timeframe precision, and confluence-driven), risk and trade management, multi-timeframe alignment, and session effects. A rigorous backtesting workflow shows how to validate the edge honestly. You will also find comparison tables (contrasting Break-and-Retest with false breakouts, SFPs, and simple breakouts), case studies, a step-by-step implementation checklist, and a robust Frequently Asked Questions section at the end. The emphasis is on rules you can trust, repeat, and refine.
What Exactly Is the Break-and-Retest?
The Break-and-Retest is a three-stage price action sequence built around a key level of support or resistance:
- Break: Price closes through a clearly defined level (a prior swing high/low, range boundary, or trendline) with sufficient conviction to suggest acceptance beyond the line.
- Retest: Price returns to the broken level and tests it from the other side—former resistance as new support, or former support as new resistance.
- Continuation: The retest holds and price resumes in the direction of the break, often with robust follow-through as trapped traders capitulate and “confirmation seekers” join.
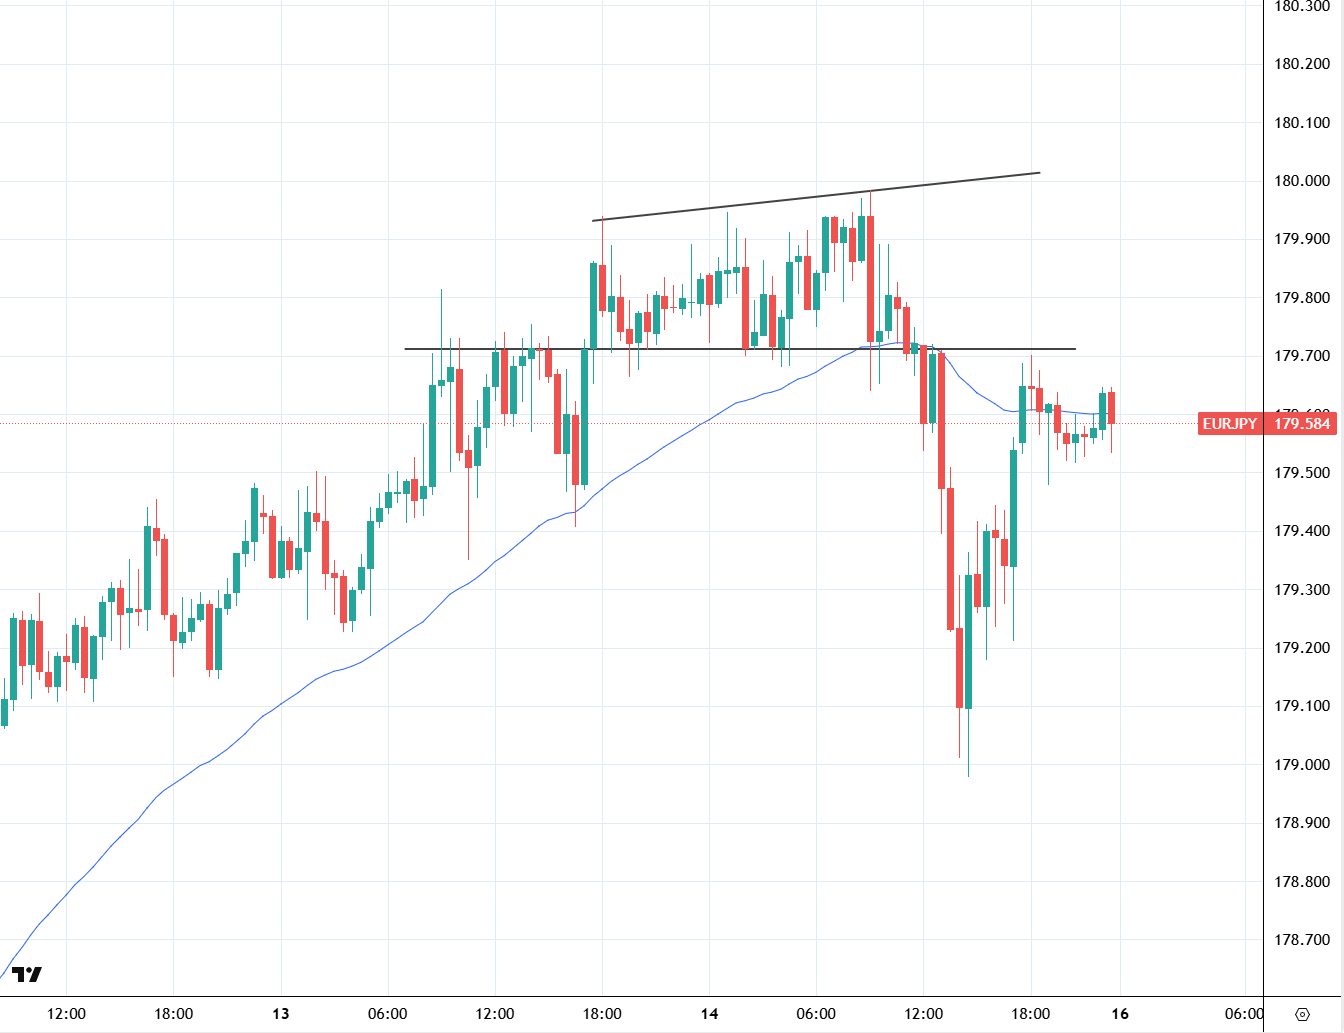
Breakout retest on a EUR/JPY 30-min chart, Source: TradingView
This sequence is not a chart “pattern” in the decorative sense; it is a structural handoff where the market demonstrates acceptance beyond a level and then verifies that acceptance when challenged from the opposite side. The critical elements are (a) a meaningful level, (b) a decisive close beyond it, and (c) a retest that rejects from the correct side. Without those three items, what appears to be a Break-and-Retest is likely just drift inside a range.
Market Psychology: Why Retests Happen
Retests are the behavioral residue of three overlapping forces: trapped traders, confirmation demand, and liquidity engineering.
- Trapped traders: When price breaks resistance, shorts who sold into the level are underwater; when price pulls back, many attempt to “escape at breakeven,” providing buy-side demand that can help the level hold.
- Confirmation seekers: Many traders avoid the initial breakout due to fear of fakeouts. They wait for the retest to confirm role reversal and then enter, fortifying the level’s defense.
- Liquidity pockets: Stops, take-profits, and resting limit orders cluster at key levels. The retest taps that liquidity to fill institutional orders, after which price often continues.
Because these behaviors repeat across sessions and instruments, Break-and-Retest setups are a reliable way to align with momentum after the market proves acceptance beyond a level.
Defining “Meaningful Level” with Precision
A Break-and-Retest is only as good as the level it revolves around. Use explicit criteria:
- Multi-touch swing points: Prior highs/lows that price has respected two or more times.
- Range edges: The clean boundary of a consolidation box; the more tests, the better.
- Session extremes: Prior day’s high/low or London/NY session highs/lows that magnetize order flow.
- Round numbers: 00 or 50 handles where stops and limit orders cluster.
- Well-defined trendlines: Diagonals with at least three anchor points; broken with body closes, not just wicks.
The more universally recognizable the level, the more likely it hosts the flows that produce a clean retest and continuation.
Recognition Rules: The Break-and-Retest Checklist
Consistent execution requires objective gates. Here is a field-ready checklist:
- Decisive break: A candle closes beyond the level with a clear body (avoid tiny closes that barely peek through). On H1/H4, prefer closes with bodies ≥ 50% of candle range.
- Time budget for retest: Retest should occur within a defined window for your timeframe (e.g., within 1–8 bars on H1; within 1–3 sessions on H4/D1). Excess delay often dilutes signal quality.
- Touch and rejection: Price returns to the level and reacts: a pin/engulfing, strong-body bounce, or lower-timeframe market structure shift.
- Context alignment: Higher-timeframe (HTF) trend favors the break direction; session is liquid (London or London–NY overlap) for majors; volatility is sufficient to carry the move beyond your first target.
- Space to target: There is clear room (no immediate opposing structure) to reach a realistic first objective (mid-range, next swing, measured projection).
Failing items #1 or #3 usually invalidates the setup. Failing #2, #4, or #5 lowers quality and suggests sizing down or skipping.
Entry Models (Rules You Can Test)
Choose one or two entry models and commit for at least a month of trades before tweaking. Mixing styles mid-trade corrodes expectancy.
1) Direct Retest Touch (DRT)
- Trigger: Enter when price first tags the broken level from the correct side.
- Stop: Beyond the opposite side of the level plus a volatility buffer (e.g., 0.25–0.50 × ATR of execution timeframe).
- Pros: Captures moves that bounce immediately; minimal slippage.
- Cons: Higher false-touch rate without a candle confirm; benefits from HTF alignment and session filters.
2) Confirmation Candle (CC)
- Trigger: Wait for a clear rejection candle at the retest (pin/engulfing/strong-body close away from level).
- Stop: Beyond rejection wick + buffer.
- Pros: Filters weak bounces; more confidence on entry.
- Cons: Enters later; may reduce reward-to-risk on shallow retests.
3) Lower-Timeframe Precision (LTP)
- Trigger: Drop from H1 to M5–M15. After the retest tag, enter on a micro break of structure (e.g., bearish to bullish shift, LH→HH flip).
- Stop: Under/over the micro pivot; move to breakeven only after the H1 level demonstrates hold.
- Pros: Tightest stops; excellent R multiples in liquid sessions.
- Cons: Requires screen time and skill; vulnerable to noise in thin hours.
4) Confluence-Only (CONF)
- Trigger: Trade retests only when aligned with HTF trend + session quality + volatility bands or MA cluster (e.g., 20/50 EMA).
- Stop: Structural with buffer as above.
- Pros: Fewer signals, higher hit-rate, smoother equity curve.
- Cons: Lower frequency; risk of watching good but non-confluent trades pass by.
Comparison Table: Entry Models at a Glance
| Model | Trigger | Typical Stop | Strength | Weakness | Best Context |
|---|---|---|---|---|---|
| DRT | First touch of the level | Beyond level + ATR buffer | Fast entries, minimal slippage | Higher false touches | Strong momentum, HTF alignment |
| CC | Rejection candle at retest | Beyond rejection wick | Filters weak reactions | Later entries, smaller R | Choppy markets during liquid sessions |
| LTP | Microstructure flip on LTF | Under/over micro pivot | Tight stops, high R | More noise, more management | London/opening impulses |
| CONF | Retest + HTF + MA/volatility confluence | Structural + buffer | Higher quality, fewer trades | Lower frequency | Trend markets with clean structure |
Stops, Targets, and Trade Management
Discipline turns an elegant idea into a durable edge. Anchor your risk and exits in structure and volatility, not hope.
- Stop placement: For bullish retests, stops go below the retest wick or level; for bearish retests, above. Add a volatility buffer (commonly 0.25–0.50 × ATR) to avoid noise stops.
- Initial targets: Stage exits. A practical sequence is partial at 1R to reduce variance, partial at the next structure (prior swing, mid-range), and an optional runner targeting a measured move or HTF level.
- Trailing: In strong trends, trail under/over higher lows/lower highs or use a volatility trail (e.g., Keltner/ATR channel). In choppy conditions, fixed targets outperform.
- Time stops: Break-and-Retest benefits from follow-through. If price fails to advance to first partial within N bars, reduce or exit; drifts often precede fake reclaims.
- Scaling in: Add only on strength: a second retest that holds or a micro HL/LH after your initial partial. Never average into losers.
Trendline and Range Retests
Break-and-Retest logic extends beyond horizontal lines.
- Trendline retests: After a break of a well-defined diagonal (three or more anchor points), a pullback to the line (now flipped) can provide precise entries. Confirmation is crucial; diagonals can be slippery.
- Range edge retests: When a range resolves, retests of the box edge (e.g., range high as new support) often offer clean entries with room to run toward measured objectives.
Always assess “space to target” and HTF bias; a perfect-looking retest can still fail if it runs headlong into a strong opposing structure.
Multi-Timeframe Alignment (Top-Down Method)
Increasing expectancy often means trading lower-timeframe entries within higher-timeframe bias:
- Map HTF context (D1/H4): Identify trend, key levels, and range boundaries. Mark obvious structures where acceptance matters.
- Choose ETF (execution timeframe, e.g., H1): Wait for decisive breaks of levels identified on HTF.
- Time on LTF (M15/M5): If using LTP, require a micro break-of-structure at the retest before entry.
The HTF tells you where and why. The ETF/LTF tells you when and how.
Session Effects and Instruments
The quality of retests varies across sessions:
- London open: Excellent for first impulsive breaks and clean retests on majors (EUR/USD, GBP/USD, USD/JPY). Liquidity and participation are high.
- London–NY overlap: Best follow-through and trend extension; a strong place for confirmation entries.
- Late NY/Asia: More noise and drift; retests during thin liquidity are prone to slow motion and second sweeps. Size down or avoid unless HTF context is compelling.
Volatile crosses like GBP/JPY and instruments like XAU/USD can deliver spectacular R multiples on retests, but they demand wider buffers and stricter time stops due to whipsaw risk.
Backtesting and Validation Workflow
A professional strategy deserves professional validation. Follow this workflow to avoid self-deception:
- Codify rules first: Write unambiguous definitions for decisive break, retest window, confirmation criteria, stop/target logic, time stops, and session filters.
- Build a diverse sample: Test at least three years and several pairs (EUR/USD, GBP/USD, USD/JPY, GBP/JPY, XAU/USD) to capture varying regimes.
- Model friction: Include realistic spreads and slippage, especially around levels where spreads can widen.
- Record distribution metrics: Win rate, average R, max drawdown, longest losing streak, time-to-first-partial, and performance by session.
- Walk-forward: Calibrate thresholds on one period; validate on the next. Repeat rolling windows to avoid curve fit.
- Forward test: Paper trade live for weeks. Verify that fills, slippage, and behavior resemble backtests before risking capital.
Case Studies (Narratives)
Case 1 — EUR/USD H1 Resistance Break, Retested as Support
Into London, EUR/USD consolidates below a multi-touch H1 resistance at 1.0880. A series of wide-bodied green candles pushes through and closes above 1.0880 with conviction. Rather than chasing, the plan requires a retest within eight bars. Two hours later, the price drifts back to 1.0880. On tag, M15 shows a brief dip that immediately reclaims, printing a bullish engulfing. Entry is taken on the engulfing close; stop sits under the retest wick with a 0.3 × ATR buffer. Partial is taken at 1R near the session mid; the second partial at the next H1 swing high. A small runner trails under higher lows. The trade exemplifies decisive break, timely retest, clean confirm, and staged exits.
Case 2 — GBP/JPY H4 Support Break Retested as Resistance
GBP/JPY trades in a well-defined H4 range. A strong red candle closes below 160.00 (range support) near the end of Asia. London retraces to 160.00, now potential resistance. The first touch produces a long-upper-wick H1 rejection; the second touch prints a bearish engulfing. A short triggers on the engulfing close; stop above the wick plus buffer. The pair rotates lower through London–NY overlap, hitting 1R at mid-range and 2R near the projected measured move from the range. The trade illustrates a classic box-edge flip with session sponsorship.
Case 3 — USD/JPY M15 Trendline Break-and-Retest with LTF Precision
A clean intraday uptrend line (three anchors) breaks on a solid M15 close. Minutes later, price retests the line from below during the overlap. On M5, the first micro lower-high fails and breaks down; that micro break-of-structure is used for entry with a tight stop above the pivot. Targets are set at an intraday swing low and then at the VWAP band. Quick partial at 1R stabilizes the P&L; a second partial exits as momentum softens. The lower-timeframe precision entry delivers high R with minimal heat.
Case 4 — XAU/USD Daily Range Break with Delayed Retest
Gold breaks out of a multi-week range and trends higher for several sessions without retesting. A week later, price finally pulls back to retest the former range high. Daily prints a strong lower-wick rejection. Because the retest is late, size is reduced and confirmation is required on H4. A H4 engulfing provides the trigger; stop below the daily rejection wick with wider buffer. The position trails under higher lows as momentum resumes. The case shows that late retests can still work if handled with conservative size and strict confirmation.
Common Mistakes and Practical Fixes
- Chasing the break: Entering on the breakout candle without a plan increases slippage and fakeout risk. Fix: Wait for retests by design; if no retest, let it go.
- Calling any pullback a retest: Random dips are not retests. Fix: Require a touch of the level (or a defined zone) and a rejection signal.
- Stops on the line: Placing stops exactly at the level invites ordinary noise to clip you. Fix: Structural stops with ATR buffers.
- No time stop: Lingering around the level erodes edge. Fix: Define N bars to first partial; exit or reduce if unmet.
- Ignoring session quality: Thin-session retests are noisy. Fix: Favor London and the overlap; size down off-hours.
- Mixing playbooks mid-trade: Switching from confirmation to touch entries after a miss usually degrades results. Fix: Pick your model and stick to it.
Implementation Checklist
- Mark HTF trend, key levels, range edges, and session extremes.
- Define decisive break rules (body close, minimum body size vs range).
- Set retest window (bars/sessions) and confirmation criteria.
- Choose one primary entry model (DRT, CC, LTP, or CONF) and one backup.
- Predefine stop method (structural + ATR buffer) and scaling plan (1R partial, structure partial, optional runner).
- Include time stops and session filters in your plan.
- Journal every setup with screenshots and notes; review weekly.
Comparison Table: Break-and-Retest vs Related Setups
| Feature | Break-and-Retest | Simple Breakout | False Breakout | Swing Failure Pattern (SFP) |
|---|---|---|---|---|
| Core Idea | Close beyond level, retest from other side, continue | Close beyond level and run without retest | Break fails; price re-enters range | Sweep beyond swing, then close back inside |
| Entry Trigger | Touch + rejection / confirm candle / LTF shift | Momentum continuation | Reclaim close or failure/retest short | Close-back-inside or retest after sweep |
| Risk Anchor | Beyond retest wick or level + ATR buffer | Beyond breakout bar low/high | Beyond fake-out wick | Beyond sweep wick + buffer |
| Best Context | Trend/box edge flips during liquid sessions | Strong trends with sustained momentum | Ranges, crowded breakouts | Obvious swing clusters; stop hunts |
| Main Risk | Shallow retest that fails to hold | Buying tops/selling bottoms if exhaustion | Re-break in original direction | Second sweep or slow reclaim |
Conclusion
The Break-and-Retest strategy endures because it codifies a natural market behavior: acceptance beyond a level, a proof test, and continuation. When you insist on a decisive break, a timely retest with clear rejection, and discipline in risk and trade management, the pattern becomes a reliable engine for entries that feel both logical and measurable. Use higher-timeframe alignment to filter contexts, structure your stops with volatility buffers, stage exits to reduce variance, and respect time stops to avoid drift.
With honest backtesting, careful forward testing, and a consistent playbook, Break-and-Retest can evolve from an attractive idea into a durable professional edge.
Frequently Asked Questions
Do Break-and-Retest setups work on all timeframes?
Yes. The logic is fractal. However, reliability improves from M15–H1 upward due to lower microstructure noise. On H4/D1, signals are fewer but tend to carry farther. Match timeframe to your availability and risk tolerance.
How long should I wait for a retest after a breakout?
Define a window aligned with your execution timeframe. On H1, many traders use 1–8 bars; on H4/D1, one to three sessions is common. If the retest occurs far beyond that window, reduce size and require stronger confirmation since context may have changed.
Is a wick touch enough, or do I need a candle close on the level?
A wick tag can be sufficient if combined with a clear rejection signal (pin/engulfing) or a lower-timeframe structure shift. If your plan is conservative, require a rejection close away from the level before entry.
Where is the best place for my stop-loss?
Beyond the retest wick or the opposite side of the level with an ATR buffer. Stops placed directly on the level get clipped during ordinary noise. Structural stops first, volatility awareness second.
How do I set targets?
A practical sequence is partial at 1R, partial at the next structure (prior swing, range midpoint, measured move), and an optional runner with a structure or volatility trail. In strong trends, allow the runner to work; in chop, favor fixed targets.
What is the difference between Break-and-Retest and an SFP?
Break-and-Retest confirms acceptance beyond a level and then verifies that acceptance on a pullback. An SFP reveals rejection of prices beyond a level (a failure and reclaim). Both can be traded, but their logic and triggers differ.
How do I avoid getting trapped by a retest that pierces deeper than expected?
Use zones, not single lines, and include an ATR buffer in your stop. If the retest drives deep into the zone without a clear rejection, stand aside or wait for a lower-timeframe structure shift before entering.
Which session is best for Break-and-Retest trades?
London and the London–NY overlap for majors. These windows provide the liquidity and participation that help retests hold and produce follow-through. Off-hours retests are possible but deserve smaller size and stricter confirmation.
Can this strategy be automated?
Yes, partially. Break detection, retest proximity, and basic candlestick confirmations are programmable. Discretionary filters such as HTF context and session quality improve results but are harder to encode perfectly. Many traders use alerts plus discretionary confirmation.
What’s the biggest mistake traders make with Break-and-Retest?
Treating any pullback as a retest and entering without rejection or structure confirmation. A second common error is placing stops too tight (on the line), which invites routine noise to take you out before the move.
How do I integrate Break-and-Retest into a broader system?
Use it as your primary entry trigger within a top-down framework: HTF defines bias and key levels; Break-and-Retest provides the timing; risk policies (fixed fractional, ATR buffers, time stops) govern survivability; and journaling fuels continuous improvement.
Note: Any opinions expressed in this article are not to be considered investment advice and are solely those of the authors. Singapore Forex Club is not responsible for any financial decisions based on this article's contents. Readers may use this data for information and educational purposes only.